
This year on Google I/O (Google’s Developer conference) Google presented a new platform that unites all ML tools. Vertex AI brings together the Google Cloud services for building ML under one, unified UI and API.
There are many benefits to using Vertex AI. You can train models without code, with minimal expertise required, and take advantage of AutoML to build models in less time. Also, Vertex AI’s custom model tooling supports advanced ML coding, with nearly 80% fewer lines of code required to train a model with custom libraries than competitive platforms.

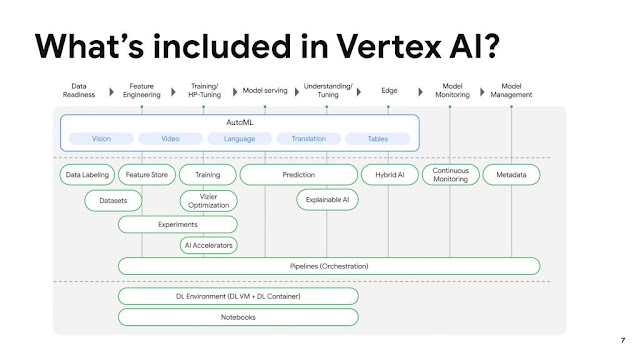
You can use Vertex AI to manage the following stages in the ML workflow:
- Define and upload a dataset.
- Train an ML model on your data:
- Train model
- Evaluate model accuracy
- Tune hyperparameters (custom training only)
- Upload and store your model in Vertex AI.
- Deploy your trained model and get an endpoint for serving predictions.
- Send prediction requests to your endpoint.
- Specify a prediction traffic split in your endpoint.
- Manage your models and endpoints.
“We had two guiding lights while building Vertex AI: get data scientists and engineers out of the orchestration weeds, and create an industry-wide shift that would make everyone get serious about moving AI out of pilot purgatory and into full-scale production,” said Andrew Moore, vice president and general manager of Cloud AI and Industry Solutions at Google Cloud. “We are very proud of what we came up with within this platform, as it enables serious deployments for a new generation of AI that will empower data scientists and engineers to do fulfilling and creative work.”
“Data science practitioners hoping to put AI to work across the enterprise aren’t looking to wrangle tooling. Rather, they want tooling that can tame the ML lifecycle. Unfortunately, that is no small order,” said Bradley Shimmin, chief analyst for AI Platforms, Analytics, and Data Management at Media. “It takes a supportive infrastructure capable of unifying the user experience, plying AI itself as a supportive guide, and putting data at the very heart of the process — all while encouraging the flexible adoption of diverse technologies.”
To learn more about how to get started on the platform, check out the ML on GCP best practices, this practitioner’s guide to MLOps whitepaper, and sign up to attend the Applied ML Summit for data scientists and ML engineers on June 10th.
If you want to try it and get to know it better you can watch a Codelab (It will cost you about $2 for running it on Google Cloud, but you can register for a $300 trial on GCP 😁 )
Comments
Post a Comment